Add A Network Printer: Difference between revisions
Jump to navigation
Jump to search
(Created page with "==Adding a Network Printer==<pre>1. Click on your Windows Start button and immediately type \\omuprint and hit Enter.</pre> Category:User Knowledge Base") |
No edit summary |
||
| (7 intermediate revisions by the same user not shown) | |||
| Line 1: | Line 1: | ||
==Adding a Network Printer== | == Adding a Network Printer == | ||
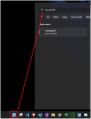
1. Click on your Windows Start button and immediately type <code>\\omuprint</code> and hit Enter. | |||
<br> | |||
[[File:Add a Network Printer - Knowledgebase.jpg|300px|none|thumb|Start Button and Command]] | |||
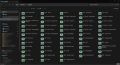
2. A window should pop up showing all available network printers. | |||
[[File:Omuprint list.jpg|300px|none|thumb|List of Available Network Printers]] | |||
3. Double-click the printer(s) you need. The drivers will install and you should be able to print immediately in Windows. | |||
*''NOTE: If you need this printer in GP, you will have to sign out and back into GP for it to be visible.'' | |||
===Gallery (for example)=== | |||
<gallery> | |||
File:Add a Network Printer - Knowledgebase.jpg|Start Button and Command | |||
File:Omuprint list.jpg|List of Available Network Printers | |||
</gallery> | |||
[[Category:User Knowledge Base]] | [[Category:User Knowledge Base]] | ||
Latest revision as of 10:33, 28 August 2023
Adding a Network Printer[edit | | edit source]
1. Click on your Windows Start button and immediately type \\omuprint and hit Enter.

2. A window should pop up showing all available network printers.

3. Double-click the printer(s) you need. The drivers will install and you should be able to print immediately in Windows.
- NOTE: If you need this printer in GP, you will have to sign out and back into GP for it to be visible.
Gallery (for example)[edit | | edit source]
-
Start Button and Command
-
List of Available Network Printers